Thursday, June 30, 2011

The Foil Method

"The thing about glitter is, if you get it on you, be prepared to have it on you forever, 'cause glitter is the herpes of craft supplies." - Demetri Martin 

So true, Demetri.  So true.  Ever tried removing a glitter manicure?  It takes forever, your cotton pad/ball/felt gets destroyed, and glitter gets everywhere.  EVERYWHERE.  In summary, it's nothing short of a complete pain in the ass.  Some folks even shy away from wearing glitters, out of fear of the imminent torture that is removal.  Never fear!  The amazing (AMAZING!) girls over at MUA have a fool proof method for getting that stuff off without all the work.  This isn't my method, but I've used it countless times, and I'm happy to share it with you!  I present....The Foil Method!

First up:  the cast of characters.  You'll need pure acetone (You can use acetone polish remover, but it may not be as effective.), small felt squares/cotton pads/cotton balls, and cut up pieces of aluminum foil.


Soak your cotton pad with acetone, and press directly onto the nail.  Cover as much of the nail with the cotton pad as possible.  (A sincere thank you to my wonderful hubby for taking all of the rest of these photos for me, since I don't have three hands.)


Cover the cotton pad and your finger tightly with a piece of aluminum foil.  


Do the same to all your fingers on one hand.  (I highly recommend doing one hand at a time.  That way you'll have one free hand to work with.)  ROBOT HAND!!!  LOL  Leave the cotton pad and foil on for 10-15 minutes.  
*NOTE:  Everyone else in the world says this should only take 5 minutes.  I have NEVER had success leaving it on for only 5 minutes.  I don't know if I'm doing something wrong, but I usually do 15 minutes and it works great every time. 


After letting it soak, peel back off the aluminum foil, but leave the cotton pad on your nail.


Push down on the cotton pad and slide off the nail.  


VOILA!  The glitter slides right off the nail and onto the cotton pad.  Repeat all these steps on your other hand, and you're done!  Pain-free glitter removal!  (Ignore the fact that my nail is horribly stained.)


And that's it!  I hope you guys give this a try, if you haven't already!  It's super easy and keeps messes to a minimum.  Those MUA ladies sure are geniuses!

Time to bust out your favorite glitter!  :-D

Wednesday, June 29, 2011

Rescue Beauty Lounge Insouciant

I know, I know, I'm a nail polish snob.  I can't help it.  Honestly, once you have had a good formula (even at $18) you'll know why.  And don't get me wrong, while I love me some Rescue Beauty Lounge (RBL) polishes, I also have a very deep serious love for Deborah Lippmann polishes.  I haven't tried any other high end brands, but if they are anything like these ladies' polishes, sign me up!

So how does one afford to buy $18 polishes on a budget?  You save your purchases for really special polishes that you can't get elsewhere, that will really complete your collection and will be ones you will wear! Well at least that's how I do it, and eat lots of ramen :).  Just kidding!

So what makes Insouciant so special.  First the formula, its goes on amazingly smooth and pigmented.  I barely had to do cleanup with this one, the polish just flows on itself.  What you end up with is a beautiful dusty lavender full of secret blue shimmer.  It's pretty obvious on the bottle, but not the nail.  You can see it, you just have to look hard for it. :)  The shimmer just gives the polish a wonderful sophistication.  Take a look!

Rescue Beauty Lounge Insouciant
(click to enlarge)
Rescue Beauty Lounge Insouciant
(click to enlarge)
Bad news guys, Insouciant is sold out and it was limited edition so it's not coming back (at least not yet!).  But you can still find it on Ebay sometimes.  Or if you have to have this polish, you can try swapping for it on MakeupAlley.com! :)  Happy hunting, it'll be worth it.

Tuesday, June 28, 2011

OPI Glam Slam! England - Grape...Set...Match and Servin' Up Sparkle

Good Morning everyone!  Today I'm totally excited to bring you the new OPI Glam Slam! England set.  I was able to snag this up online last week, so I can bring it to you before it's available at Ulta stores.  I am even more in love with this set then I thought I would be.  I new I wanted it as soon as the press release came out, and then when I saw Scrangie's pictures of it and described it as a less black version of OPI Ink.  OPI Ink is one of my favorites, so I was excited about this one.

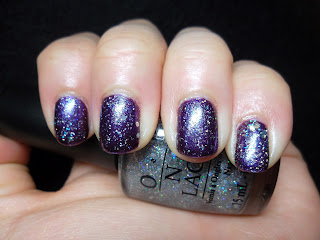
First up is Grape...Set...Match.  I'm not into tennis, but that's a super cute name!  It really is a less black version of OPI Ink.  It's a duo-chrome that almost got a foil finish to it in a gorgeous deep grape purple color.  The foil-like finish is due to the tiny sparkles in the polish.  These pictures aren't 100% accurate, it was hard to do this polish justice.  The picture also look like the polish is gritty, but I promise you it's not.  My camera and I are still fighting, but it's getting better.  Now I know why Courtney is always so frustrated photographing purples.  As for the duo-chrome - depending on the light it either looks this royal purple seen here or a more red based purple (you can see it in the bottle in these pics).  I even took a little video for you so could see a better representation of the color, finish and sparkle.

OPI Grape...Set...Match
(click to enlarge)
OPI Grape...Set...Match
(click to enlarge)

OPI Grape...Set...Match
(click to watch)


Now it's time to layer on Servin' Up Sparkle!  This is a glitter top coat.  No, scratch that, this is an AWESOME glitter top coat.  It's got a ton of tiny silver holographic glitter, and some larger hexagon shaped holographic glitter. All you need it one coat to get the perfect density of glitter.  You will need a thick layer of top coat to get a smooth finish though, due to the hexagon glitter.  Scrangie's post has some great pictures of Servin' Up Sparkle alone, but I just wore it right on top.  I can't wait to try this polish layered over black!  I included another video so you can really see the holographic glitter in action!

OPI Servin' Up Sparkle - over OPI Grape...Set...Match
(click to enlarge)
OPI Servin' Up Sparkle - over OPI Grape...Set...Match
(click to enlarge)
OPI Servin' Up Sparkle - over OPI Grape...Set...Match
Blurry pic to enhance the sparkle!
(click to enlarge)

OPI Servin' Up Sparkle - over OPI Grape...Set...Match
(click to watch)

If you love purples, OPI Ink, or holographic glitter top coats, I suggest you pick this one up as soon as it's available.  I got mine from NailSupplies.us, but it's currently out of stock.  You might have to wait for this one to come to your local Ulta or salon.  It should retail for around $17.

And apologies still for my pictures.  I'm working hard to get them looking good, but I'm still have trouble.  I did a mini-crash course with Courtney last weekend and I think there is some improvement, but it still looks like my camera is focusing on the  finger rather than the nail.  I also get wicked glare... maybe I'll try a light diffuser?  My biggest issue is my camera's auto-focus, it really hates me and it continuously refusing to focus on macro pictures when I'm close up.  Let me know if you have any tips for me on how to improve my pictures.

Monday, June 27, 2011

OPI Glam Slam France: Spark de Triomphe and White Shatter

After my vampy-on-the-first-day-of-summer fiasco, I made sure to go for something that screamed summer for my weekend mani.  Summer means sunshine, and what could rival a holo for sunny day mani?  GLITTER!  I dove head first into OPI's French Open Glam Slam duo.  Created with Serena Williams, the France duo contains a sparkly glitter and a brand spankin' new white shatter.  Bring it, summer!

I started with the glitter - Spark de Triomphe.  It's a combination of gold and silver glitter in different shapes and sizes, including small and large hexagonal and round glitter, all suspended in a clear base.  The gold and silver together give an overall color that's somewhere between champagne and pale gold, depending on the light.  It applies pretty easily for a glitter, but unless you want to layer this over another color (Two coats over OPI Glitzerland would be perfect!), you're gonna need at least three coats (shown here) to get this one opaque.  It dries rough and bumpy, as with any glitter, but you can smooth it out with a coat of Gelous or Instant Artificials (both thick, acrylic-based base coats found at Sally's) before your top coat.  Pleeeeease click to enlarge these photos to check this one out up close!

(click to enlarge)
(click to enlarge)

Ohhhh, you guys, I am in LOVE with this polish!  I'm not a huge glitter girl, but I love everything about this polish, from the name to the color, to the sparkle!  And boy, does it sparkle!  Even in low lighting, it was gorgeous!  My pictures don't even remotely do it justice!  I loved this so much, I wore it alone for three days!

...And then I added White Shatter.  I'm gonna be honest.  I never intended to get the White Shatter.  I really only wanted Spark de Triomphe, so I tried swapping for it.  Turns out my lovely swapper wanted to swap the set, so the shatter found its way home to me.  I loved Spark so much on its own, I was kind of sad and scared to cover it up with the shatter.  The two were meant to go together, so I forced myself to try it out.  One medium-thin coat of shatter later, and here's the result:

(click to enlarge)
(click to enlarge)

Well.  It's not as bad as I feared it would be, but I just really don't love it.  White Shatter was super easy to work with, it's totally opaque, and I think it looks cool with the glitter poking through the cracks, but Spark de Triomphe is the star in this duo, and it's just too gorgeous to cover up!  It's a good look, but I prefer the glitter all by its sparkly self.  :-)

So, White Shatter gets a pass from me, but Spark de Triomphe is a MUST HAVE.  MUSTTTT HAAAVE!  It's stunning!  Perfect in every way, shape, and form!  This duo was part of OPI's May Glam Slam collection, so you should RUN (don't walk!) to your nearest Ulta to grab it while you can!  I'm telling you guys - it's all that and a bag of chips!  Mmmm...chips....

Sally Hansen Barracuda

Isn't it always the case, the ones you love the most will hurt you.  Barracuda is that for me.  The color is to die for.  Perfect for summer; perfect for my skin tone.  It almost takes the place of my top blue polish - that would be RBL 360, unless we count teals too, then OPI Catch Me In Your Net gets involved.

Anyway, let me tell you first what I love about this polish.  I love the color.  It's a creamy light blue, with barely any green in it (just enough to make it look not washed out and super summery).  It just screams put on a cute sundress and go for a stroll on the beach.....

And then, there is the formula.  Honestly, it's crap.  You open the bottle and the formula and consistency looks great, but 1 coat in, it's uneven, refused to flow, and starts to lump up.  I needed 3 coats, and by coat 3 it was a blobby mess.  I literally took it off and restarted this mani 3 times, each time putting in more and more thinner.  I still wasn't happy at the end, but I got tired and gave up.  You should be able to see the uneven generally crappyness in these pictures.  To top it off, with layering on three thick gloopy coats that weren't even on themselves (the polish literally just stays where you put it and refuses to flow across the nail no matter how hard I try), I got MAJOR cracking along the edges the next day.  UGHHH!  Ironically no tip wear though...

Last gripe is about this brush.  So this is my first Sally Hansen Complete Salon Manicure.  I heard the brush was huge and paddle shaped, but had never seen it in real life. SERIOUSLY?!!!  Who likes brushes like this. OK, well I'm sure some people do, but I am not one of them.  I'm all for a thick brush (love the OPI Pro-Wides) but this brush has no give at all.  I honestly think I'll put this polish in the next top coat bottle I reach the end of, I hate the brush that much.

Alright, enough of my complaining - onto the polish!

Sally Hansen Barracuda
(click to enlarge)
Sally Hansen Barracuda - slightly different lighting
(click to enlarge)
Sally Hansen Barracuda - after 2 days of wear - HELLO cracks! Can you spot them?
(click to enlarge)
The Sally Hansen Complete Salon Manicure line is available at Target and Drugstore and usually retails between $7 and $8 dollars.  It's supposed to be used alone without basecoat or topcoat.  I ended up not using a basecoat (no staining!) but did put some Seche Vite one (after 3 failed manis I was tired and wanted to go to bed).  Barracuda is part of the Limited Edition Summer 2011 Series designed by Tracy Reese.  It's pretty hard to find (it took me 5 stores before I found a display that still had Barracuda in it), but it's technically still available.

Saturday, June 25, 2011

Making it Officially Official!

It's been so much fun having Jessie post on here as a guest blogger over the last couple of weeks!  I love the different perspective and different style that she's brought to the blog, and I'm sure you guys have enjoyed reading her posts as much as I have.  She and I have become such a great team, and I'm soooooo ridiculously excited to finally bring her on as a co-blogger!!

I can't wait to see how our blog grows!

WELCOME, JESSIE!!  :-D

Thursday, June 23, 2011

L'Oreal Femme Noir

Two days ago was the first official day of summer - one of my absolute favorite days of the year!  I'm a summer girl, so I spend all winter cursing the cold and dreaming of when I can wear flip flops again.  Somehow I didn't even realize the summer solstice rolled around, so ya know what I did?  I picked just about the darkest color possible for my manicure.  Yeah...I wore a vampy on the first day of summer.  D'oh!

My color blunder was L'Oreal Femme Noir.  It's hard to pinpoint exactly how to describe this one.  Under more direct lighting, it looks like a deep blackened "lit-from-within" red shimmer.  My photos show exactly that.  It's literally like this stuff is glowing red.  In most other lighting, it shows more of an espresso black-brown with subtle brownish-red shimmer.  The application wasn't my favorite, but it wasn't impossible either.  I think the L'Oreal brush is just not a great brush, but the pigmentation was great.  Two coats was all I needed!

(click to enlarge)
 (click to enlarge)

Femme Noir...what a name, right?!  Love it!  Reminds me of a Bond girl or something.  It was released with L'Oreal's Midnight Muse collection from last fall, and it was crazy popular on MUA.  It was also crazy hard-to-find, because L'Oreal only put two of them in each display!  I'm always on the hunt for my perfect vampy polish, so I wanted to give this one a try, but never managed to find it myself.  I actually got this one in a swap with a lovely lady in my area (Hi, Anne!!).

Alas, I don't think Femme Noir is my perfect vampy.  If it looked like it did in my photos all the time, I think it'd be a match made in heaven.  Unfortunately, that's just not the case.  I think it's "typical" showing is pretty, but nothing special.  Any old deep shimmery brown would do the job.  Sigh.  One day I'll find you, Perfect Vampy (and your little dog, too!)!  Maybe you're in hiding with Perfect Nude???

The good news?  I promise I changed into a more summer-appropriate mani for the weekend!
;-)

Wednesday, June 22, 2011

Essie Super Bossa Nova

As promised, here is Essie Super Bossa Nova.  A beautiful pink packed full of pink and purple shimmer.  It went on easy in two coats, but it wasn't nearly shiny enough for me so I had to break out my Seche Vite to get that high gloss finish this pink craved.  I snapped these pics while at a car fest with my boyfriend Chris.  Pretty good use of time I think :)

Essie Super Bossa Nova
(click to enlarge)
So I really wanted to do a comparison of Super Bossa Nova against my other pinks.  OPI's Pompeii Purple and That's Berry Daring were the closest I had.  I've also seen requests for a comparison of Super Bossa Nova against China Glaze Ahoy!.  So here we go!

From Left to Right: China Glaze Ahoy!, Essie Super Bossa Nova, OPI Pompeii Purple, OPI That's Berry Daring
(click to enlarge)
Hopefully you can tell from the picture (I'm still working out how to take good pictures indoors), but China Glaze Ahoy! isn't anywhere close to Essie Super Bossa Nova.  Ahoy! is a raspberry jelly packed with gold shimmer.  The other three polishes are all definitely pink.  Pompeii purple has a blue flash, but the base close is very similar to Super Bossa Nova.  That's Berry Daring seems to have the same base, but looks like a straight up creme (despite the beautiful blue flash in my bottle). Honestly, even thought I love Super Bossa Nova, out of the 4 it's probably the one I'd be willing to part with.  I think it's due to the lack of a shiny finish.

Essie Super Bossa Nova is part of Essie's 2011 Summer Collection - Brazilliant.  It can be found at Ulta, Drugstores or online for $8.

Tuesday, June 21, 2011

OPI Ate Berries in the Canaries

I promised you guys more pink, so more pink you shall have!  :-)

For my weekend manicure, I decided to dive into my stash for an old favorite - OPI Ate Berries in the Canaries.  Not many pinks jive well with my skin tone, but this is one of the few that does.  Yay!

Ate Berries is a (surprise!) berry pink creme.  It's kind of hard to describe, because while it's certainly pink, it also falls heavy to the purple side.  It's almost a raspberry color.  But not really real raspberries.  More like artificially flavored raspberry candy.  It applies like a dream in two easy coats.  I have to be honest here.  These photos aren't even remotely color accurate.  I tried to take as many as I could in different lighting, but I just couldn't get the "berry" color to come out.  I tried adjusting the color in my photos, but failed miserably.  Sorry, guys!!  Imagine the color to be a deeper, more saturated, but vibrant raspberry pink.

(click to enlarge)
 (click to enlarge)
(click to enlarge)
(click to enlarge)

This is seriously one my favorite pinks ever!  It's so saturated and gorgeous!  Makes a great pedi color too!  :-)  Ate Berries in the Canaries was released with OPI's Spain collection of Fall 2009.  Seems kind of out of place in a fall collection, no?  Either way, it's an amazing color, and thankfully made the cut to the permanent collection.  It's been rumored to be dupe-y to Deborah Lippmann's Between the Sheets.  I don't have that one to compare, but Jessie does and she tells me they're close, but not complete dupes.  They're probably different enough to own both, but if you want to save some money, you can pick up the OPI for almost half the price.  (But those Lippmann bottles are so prettyyyyyy!)

I thought I'd spice up my plain ol' creme with some glittah!  I threw on two coats of OPI Mad as a Hatter over Ate Berries on my thumb for a "Blackberry manicure."  Ate Berries works perfectly with the multi-colored glitter in Mad as a Hatter.  A match made in heaven!  Click to enlarge to see all the awesomeness that is Mad as a Hatter!  :-)


...And then after I took my photos I managed to screw up both thumbs so horribly that I had to take off the glitter and just throw on another two coats of Ate Berries.  Sigh.  I hate wasting any awesome glitter, but I especially hate wasting and awesomely hard-to-find glitter.  Argh!  Can't win 'em all, right?  ;-)

Monday, June 20, 2011

OPI Turquoise Shatter

Shatter... oh how I tried to resist.  I made it through the China Glaze Crackles, OPI Black Shatter, OPI Silver Shatter without blinking an eye.  Then OPI made an announcement that they were releasing 3 "blue" shatters!!!! I instantly feel in love with Navy, Turquoise and Blue Shatter, but I still wasn't convinced the look of shattered nail polish was for me.  So I told myself I could get one to try, and if I liked it then I could get more.

I ordered it online because my local Ultas are constantly failing me.  I really think someone comes in to both my local Ultas the day everything is released and just buys up the store!  I found it online and ordered it immediately.  It came just in time for me to wear it with Essie Super Bossa Nova (which I'll highlight in my next post), the perfect combination for my 80's themed outfit to see The Legwarmers on Saturday night.  (The Legwarmers were AMAZING by the way and you should definitely go check them out if they ever visit a city near you).  I wasn't home much this weekend but thankfully it was super sunny and allowed me to take some great pictures of OPI Turquoise Shatter over Essie Super Bossa Nova.

OPI Turquoise Shatter
(click to enlarge)
OPI Turquoise Shatter
(click to enlarge)
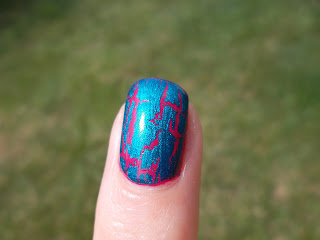
Close up of OPI Turqoise Shatter over Essie Super Bossa Nova
(click to enlarge)
Hopefully you can tell why I love Turquoise Shatter so much.  It's beyond gorgeous and I can't wait to try it over other colors. Turquoise shatter is a beautiful summer turquoise that leans more green indoors and blue outside.  It's got a beautiful shimmer to it that can be seen both inside and out. For this look, I layered one coat of OPI Turquoise Shatter over two coats of Essie Super Bossa Nova.

OPI Turquoise Shatter was just released for the summer and can be found at Ulta for $8.50.  Since my Ulta is constantly out of everything, I got mine at Aveyou.com for the same price.  I'm planning on picking up Blue and Silver Shatter now that I've worn this and I can't wait until the new China Glaze Metallic Crackles come out!!!!!!!

Thursday, June 16, 2011

Rescue Beauty Lounge Orbis Non Sufficit

Jessie and I must really be on an RBL kick lately, 'cause she and I both are just blazing through them!  I'm keeping the party going with Orbis Non Sufficit.

I had my eye on Orbis for quite some time, but never pulled the trigger (so typical for me, right?).  Of course within a few months it sold out - never to be seen again.  The lemming monster hit me hard, and yet again I found myself pining after a polish I couldn't have.  I was lucky enough to be given a decant of Orbis, along with decants of RBL Scrange, OPI Sapphire in the Snow, and OPI Damone Roberts 1968, from an incredibly generous lady on MUA named Marlene.  It wasn't a swap, but an RAOK (Random Act of Kindness), in which she sent these samples to me out of the kindness of her heart, not asking for anything in return.  It's one of the nicest things someone's ever done for me, and Marlene - if you're reading this - I can't thank you enough!  MUAH!

Orbis is a medium-deep dusty green creme that falls somewhere between olive and forest green.  I can't speak too much on the application, because this was given to me in a small mini bottle with a different brush from the standard RBL brush, but I can tell you that even then, it applied extremely smoothly.  The pigmentation was awesome - what you see below is just one coat!  It reminded me of RBL Dead Calm, without the heinous bleeding during cleanup.  It's also suuuuper shiny, even without a top coat (but you know I still slathered it in it!).  I was sad my mini bottle was so small, because I had to pose with my Seche Vite instead.  :-P

(click to enlarge)
 (click to enlarge)

Love this!  It's a green creme dream! Orbis was created by Steph from The Polish Addict as part of the Fall 2009 Blogger Collection.  The collection also included Mismas, created by Michelle from All Lacquered Up, and Scrangie, created by none other than Scrangie.  If you're curious about the name, Orbis Non Sufficit translates to "The World is Not Enough" - the Bond family motto.  Brownie points!

I had an uneasy feeling that I may have already had a dupe for Orbis in my stash.  I pulled out Orly Enchanted Forest for yet another comparison.  Enchanted Forest has been my go-to medium-dark dusty green creme for quite a while now.  

(L) RBL Orbis Non Sufficit, (R) Orly Enchanted Forest

Sigh of relief.  Not dupes!  Even though I'd describe these to you in the exact same way, you can see that Enchanted Forest is deeper and bluer than Orbis.  Different enough to own both, though if you own one you may not necessarily need the other.  I'm happy to have both!  :-D

If you're as smitten as I am, there's good news and bad news for you.  The bad news is that Orbis has been sold out for a good couple of months now.  The good news is that it was just voted back in RBL's Vintage Bring it Back Vote.  I'd expect it to be back in stock sometime early next year, just judging from the timeframe from the last Bring it Back vote.  Can't wait!  *\o/*  Yay!

Tuesday, June 14, 2011

Rescue Beauty Lounge Catherine

So during my trip to Rescue Beauty Lounge (RBL) in NYC, I got a Catherine pedicure and completely fell in love with the polish. Too bad it's Limited Edition and has been sold out for quite some time. To add insult to injury, I could have bought Catherine many times, including during the 50% off sale (RBL no longer has these, so don't get your hopes up). Catherine is part of "The Real Housewives of the Tudor Dynasty" collection that Ji Baek created for Fall 2010. And even though I saw many swatches of all the Tudor ladies, I never thought they were special enough to purchase. Unfortunately pictures do not do this polish justice. Even my favorite nail polish bloggers can't capture the real life beauty and shimmer of this. One just has to trust that you NEED a polish like this. Too bad I didn't....

Enter Pam from Polish Police. I contacted Pam on MUA (a message board for makeup and nail polish) to see if she was interested in swapping her brand new Catherine for any polish on the RBL website, that I would purchase and send her. She quickly said yes, selected Grunge, and our swap was underway!!! We added another polish to our swap as well - Pepto Pink for Recycle - so look for Recycle later on too. Pam was amazing to chat and swap with - thanks Pam!!!! Now let's give Catherine some love.

Rescue Beauty Lounge Catherine
(click to enlarge)

Rescue Beauty Lounge Catherine
(click to enlarge)

Rescue Beauty Lounge Catherine
(click to enlarge)

Catherine is definitely one of my favorite RBL polishes. A deep, dusty, royal purple with gorgeous shimmer. The RBL site says the shimmer is pewter, blue, and fuchsia. You can see the shimmer really well in the 3rd picture. This polish applies like butter. It's so smooth and flows so evenly. I also spoil myself when I use RBL polish, and use the RBL treatment system as well. It's so easy and gets me a minimum of 5 days of wear (which for me is a lot).

Catherine isn't currently sold on on Rescue Beauty's website, but it does pop up on Ebay occasionally. Ji Baek is closing her New York Salon on June 24th for an online only business, and has stated via her facebook page that they may find boxes of sold out polish during their shutdown, so if there is any hope of buying direct from the source, it's best to start stalking now through the end of June. RBL Polish retails for $18.

Monday, June 13, 2011

My Beach Manicure: Milani HD and OPI Paris Couture For Sure

Hello lovelies!  The hubby and I just got back from celebrating our two year anniversary with a fabulous weekend at the beach in Ocean City, Maryland.  YAY!  Okay, it was really more like a few hours at the beach and then hitting up bars with friends, but same difference, right?  ;-)  Knowing I'd finally be exposed to more sun in one weekend than I had all year, I had to do a manicure that thrived off the sun - holographics!!

I started with Milani 3D Holographic polish in HD.  HD is a silver scattered (meaning the rainbow/oil slick effect is weaker and kind of dispersed, or "scattered" on the nail) holo, and was surprisingly sheer.  I used three coats for what you see below, and I still had some VNL.  Application was easy, and I didn't need to use any special base coats.  Scattered holos are a little tricky to photograph, as you need the light to hit them in just the right way to really show off their beauty, so I took a ton of photos.  I'm sure you guys don't mind.  ;-)

The first two photos were taken under my Ott-Lite.
 (click to enlarge)

 And since holos love sun, the next two photos were taken in sunlight.
 (click to enlarge)

The Milani holos are really great and super affordable.  I'm pretty sure Milani made these permanent, so you can find them for less than $5 at your local CVS, Rite Aid, etc.  You can also get them from Milani's website, along with a few other favorite Milani hard-to-finds, at www.milanicosmetics.com.

I loved the look of HD, but I wanted to spice it up a bit.  I found OPI Paris Couture for Sure on my first dusty hunt with Jessie and had been dying to try it out.  This was the perfect opportunity!  PCFS (that name is way too long to type out over and over again) is an old black-label OPI that was released with the Shopping Around the World holiday collection back in 2005.  It's labeled as a "glitter top coat," but it really isn't a glitter at all.  It's more of a very fine irregular holographic flakie to my eyes.  I'd call it a scattered holo, but it certainly has some linear holo qualities.  (Linear holos have a very pronounced rainbow/oil slick effect on the nail.  They're not as sparkly, but the overall effect is jaw-dropping.  I have a few to show you - just waiting for a good sunny day!)

OPI PCFS is very sheer - even more so than Milani HD - which makes it perfect for layering.  I added just one coat of PCFS over HD.  It applies extremely well, and I was so happy with the result!  You can see how much more pronounced the holographic effect is!  The first three photos were taken under my Ott-Lite.

 (click to enlarge)
 (click to enlarge)

And then in sunlight.
 (click to enlarge)

PCFS is so awesome!  I hate that it was limited edition.  Your best bet for tracking this one down is swapping, dusty hunting, or shelling on on eBay.  There's no listings currently, but I see them pop up all the time.  It's one of the few that I'd say would be worth it.  It's just too cool!


OPI Paris Couture for Sure and Milani HD say hello from the beach!  :-D